CAGradientLayer Explained
How to natively draw gradients on iOS and macOS with CAGradientLayer
iOS and macOS have built in support for drawing gradients in QuartzCore with the CAGradientLayer class, no custom CoreGraphics drawing in -drawRect: with CGContextDrawLinearGradient necessary.
Another advantage of CAGradientLayer over using CoreGraphics, besides the convenience, is that CAGradientLayer is rendered directly by the GPU itself. Compared to drawing a gradient with CoreGraphics, which will draw into a buffer on the CPU and then send that to the GPU.
Linear (Axial) Gradients
To create a linear gradient from one color to another (or several) the layer's type must be set to kCAGradientLayerAxial (.axial). The colors must be CGColor's, not UIColors. If you forgot this the color object is just ignored completely.

// Objective C

gradientLayer.colors =
@[
    (id)[UIColor colorWithRed: 48.0/255.0 green: 35.0/255.0 blue: 174.0/255.0 alpha: 1.0].CGColor,
    (id)[UIColor colorWithRed: 200.0/255.0 green: 109.0/255.0 blue: 215.0/255.0 alpha: 1.0].CGColor
];
// Swift

gradientLayer.colors =
[
    UIColor(red: 48.0/255.0, green: 35.0/255.0, blue: 174.0/255.0, alpha: 1.0).cgColor,
    UIColor(red: 200.0/255.0, green: 109.0/255.0, blue: 215.0/255.0, alpha: 1.0).cgColor
]
Start Point and End Point
The start and end point of the gradient can be changed to get different effects.
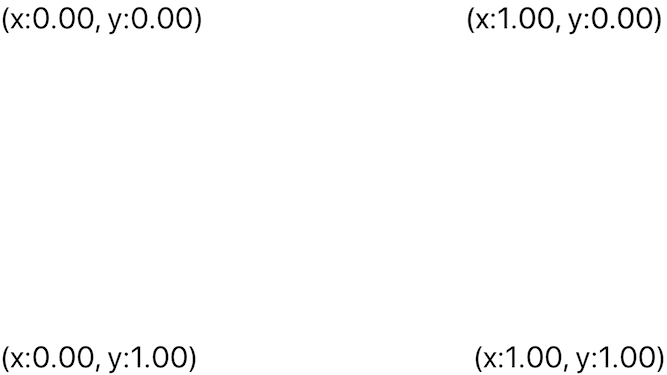
For gradients the X and Y axis go from 0 to 1, across their length. So a start point of (x:0, y:0) is the top left corner.
By default the start point is (0.5, 0.0), half way across the horizontal and at the top vertically, and the end point is the bottom middle of the view (0.5, 1.0).
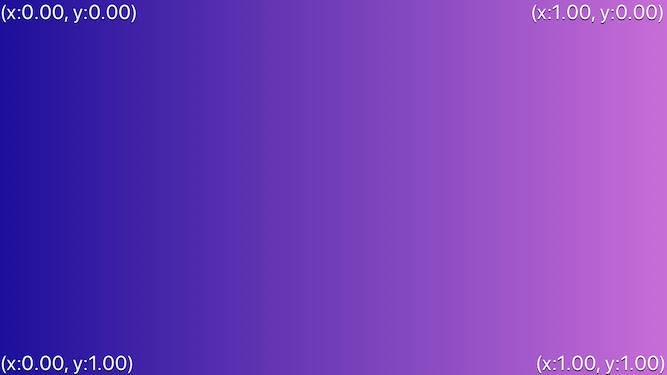
The code to create this example horizontal gradient is:
// Objective C

// Set type (Axial is already the default value)
gradientLayer.type = kCAGradientLayerAxial;
// Set the colors (these need to be CGColor's, not UIColor's)
gradientLayer.colors =
@[
    (id)[UIColor colorWithRed: 48.0/255.0 green: 35.0/255.0 blue: 174.0/255.0 alpha: 1.0].CGColor,
    (id)[UIColor colorWithRed: 200.0/255.0 green: 109.0/255.0 blue: 215.0/255.0 alpha: 1.0].CGColor
];
// Set the start and end points
gradientLayer.startPoint = CGPointMake(0, 0);
gradientLayer.endPoint = CGPointMake(1, 0);
// Swift

// Set type (Axial is already the default value)
gradientLayer.type = CAGradientLayerType.axial
// Set the colors (these need to be CGColor's, not UIColor's)
gradientLayer.colors =
[
    UIColor(red: 48.0/255.0, green: 35.0/255.0, blue: 174.0/255.0, alpha: 1.0).cgColor,
    UIColor(red: 200.0/255.0, green: 109.0/255.0, blue: 215.0/255.0, alpha: 1.0).cgColor
]
// Set the start and end points
gradientLayer.startPoint = CGPoint(x: 0, y: 0)
gradientLayer.endPoint = CGPoint(x: 1, y: 0)
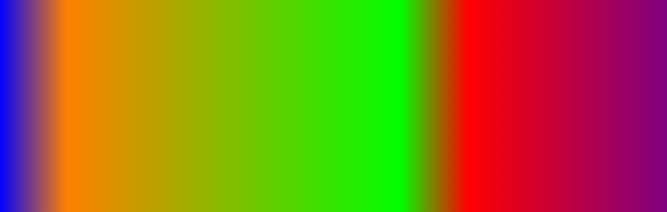
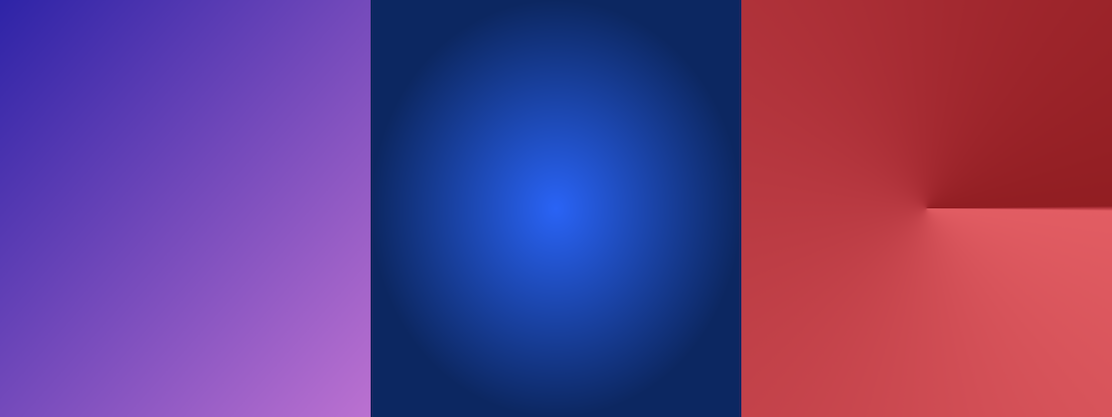
Multiple Colors and Positions
Most of my uses for gradients only involve 2 colors, but the colors property is an array of colors are you can add as many as you want.

gradientLayer.colors =
@[
    (id)[UIColor blueColor].CGColor,
    (id)[UIColor orangeColor].CGColor,
    (id)[UIColor greenColor].CGColor,
    (id)[UIColor redColor].CGColor,
    (id)[UIColor purpleColor].CGColor
];
The locations property can be used to control how the colors are distributed across the layer.
// ObjC
gradientLayer.locations = @[
    @0,   // blueColor
    @0.1, // orangeColor
    @0.6, // greenColor
    @0.7, // redColor
    @1    // purpleColor
];
// Swift
gradientLayer.locations = [
    0,   // blueColor
    0.1, // orangeColor
    0.6, // greenColor
    0.7, // redColor
    1    // purpleColor
]
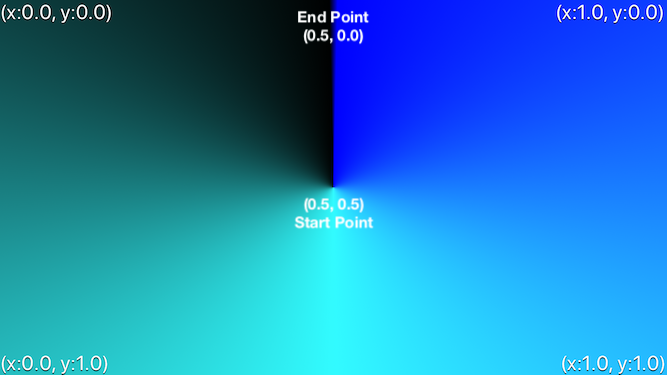
Radial Gradients
To create a radial gradient out from one point the layer's type must be set to kCAGradientLayerRadial (.radial).
The start and end point are important, as the endPoint's x and y define the end of the second color.
With a startPoint in the center (0.5, 0.5), an endPoint x of 0 or 1 will draw from the center to the outer edge of the view horizontally.
An endPoint Y of 1 or 0 will draw the gradient to the height of the view.
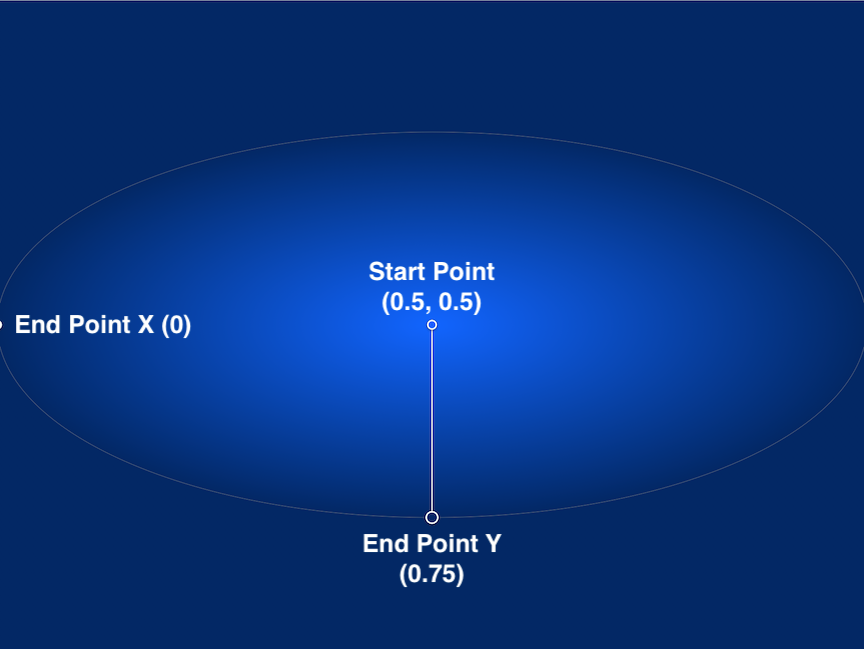
The code to create this example gradient is:
// Objective C

// Set the type
gradientLayer.type = kCAGradientLayerRadial;
gradientLayer.colors =
@[
    (id)[UIColor colorWithRed: 0.0/255.0 green: 101.0/255.0 blue: 255.0/255.0 alpha: 1.0].CGColor,
    (id)[UIColor colorWithRed: 0.0/255.0 green: 40.0/255.0 blue: 101.0/255.0 alpha: 1.0].CGColor
];
// Start in the center
gradientLayer.startPoint = CGPointMake(0.5, 0.5);
// End at the outer edge of the view
gradientLayer.endPoint = CGPointMake(0, 0.75);
// Swift

// Set type to radial
gradientLayer.type = CAGradientLayerType.radial
// Set the colors
gradientLayer.colors =
[
    UIColor(red: 0.0/255.0, green: 101.0/255.0, blue: 255.0/255.0, alpha: 1.0).cgColor,
    UIColor(red: 0.0/255.0, green: 40.0/255.0, blue: 101.0/255.0, alpha: 1.0).cgColor
]
// Start point of first color in the middle of the view
gradientLayer.startPoint = CGPoint(x: 0.5, y: 0.5)
// End points to the edges of the view
gradientLayer.endPoint = CGPoint(x: 0, y: 0.75)
Angular (Conic) Gradients
Whereas linear and radial gradients have been part of the iOS SDK forever (iOS 3.0 & 3.2 respectively & macOS 10.6) angular, or conic as CoreAnimation calls them, gradients were only added in iOS 12.0 (macOS 10.14).
The startPoint is the point at which the gradient is drawn around.
The endPoint is the point the start/end line draws aiming at.
The code to create the example angular gradient is:
// Objective C

gradientLayer.type = kCAGradientLayerConic;
// Set the colors
gradientLayer.colors =
@[
    (id)[UIColor blueColor].CGColor,
    (id)[UIColor colorWithRed: 50.0/255.0 green: 251.0/255.0 blue: 255.0/255.0 alpha: 1.0].CGColor,
    (id)[UIColor blackColor].CGColor
];
// Start point of first color in the middle of the view
gradientLayer.startPoint = CGPointMake(0.5, 0.5);
// End points to the edges of the view
gradientLayer.endPoint = CGPointMake(0.5, 0);
// Swift

gradientLayer.type = CAGradientLayerType.conic
gradientLayer.colors =
[
    UIColor.blue,
    UIColor(red: 50.0/255.0, green: 251.0/255.0, blue: 255.0/255.0, alpha: 1.0).cgColor,
    UIColor.black
]
gradientLayer.startPoint = CGPoint(x: 0.5, y: 0.5)
gradientLayer.endPoint = CGPoint(x: 0.5, y: 0)
UIView Wrapper
As layers are a little annoying to work with in UIKit, with implicit animations and separate layout, I almost always use it via wrapping it in a custom UIView subclass.
You can actually change the underlying type of a UIView by overriding the +(Class)layerClass class method and returning any CALayer subclass.
Objective C Subclass. Redefining the layer property means view.layer will happily return the correct layer class, and @dynamic layer; tells it not to auto-synthesize anything for that deceleration.
// KHGradientView.h
@import UIKit;
@import QuartzCore;

@interface KHGradientView : UIView
@property(nonatomic, readonly, strong) CAGradientLayer *layer;
@end


// KHGradientView.m
#import "KHGradientView.h"

@implementation KHGradientView
@dynamic layer;

+(Class)layerClass{
    return [CAGradientLayer class];
}

@end
// Swift Subclass

import UIKit

class KHGradientView: UIView {
    override open class var layerClass: AnyClass {
       return CAGradientLayer.classForCoder()
    }
    var gradientLayer : CAGradientLayer {
        return self.layer as! CAGradientLayer
    }
}
It's incredibly minimal, but makes things much easier in the rest of the codebase.
Example Project
The example code Xcode Project to produce the opening example image is available on Github: