Loading Oversized 360 Panoramas with Metal
Comparing GPU single-texture uploads, vertical strip tiling, grid tiling, and the CPU fallback for huge equirectangular images.
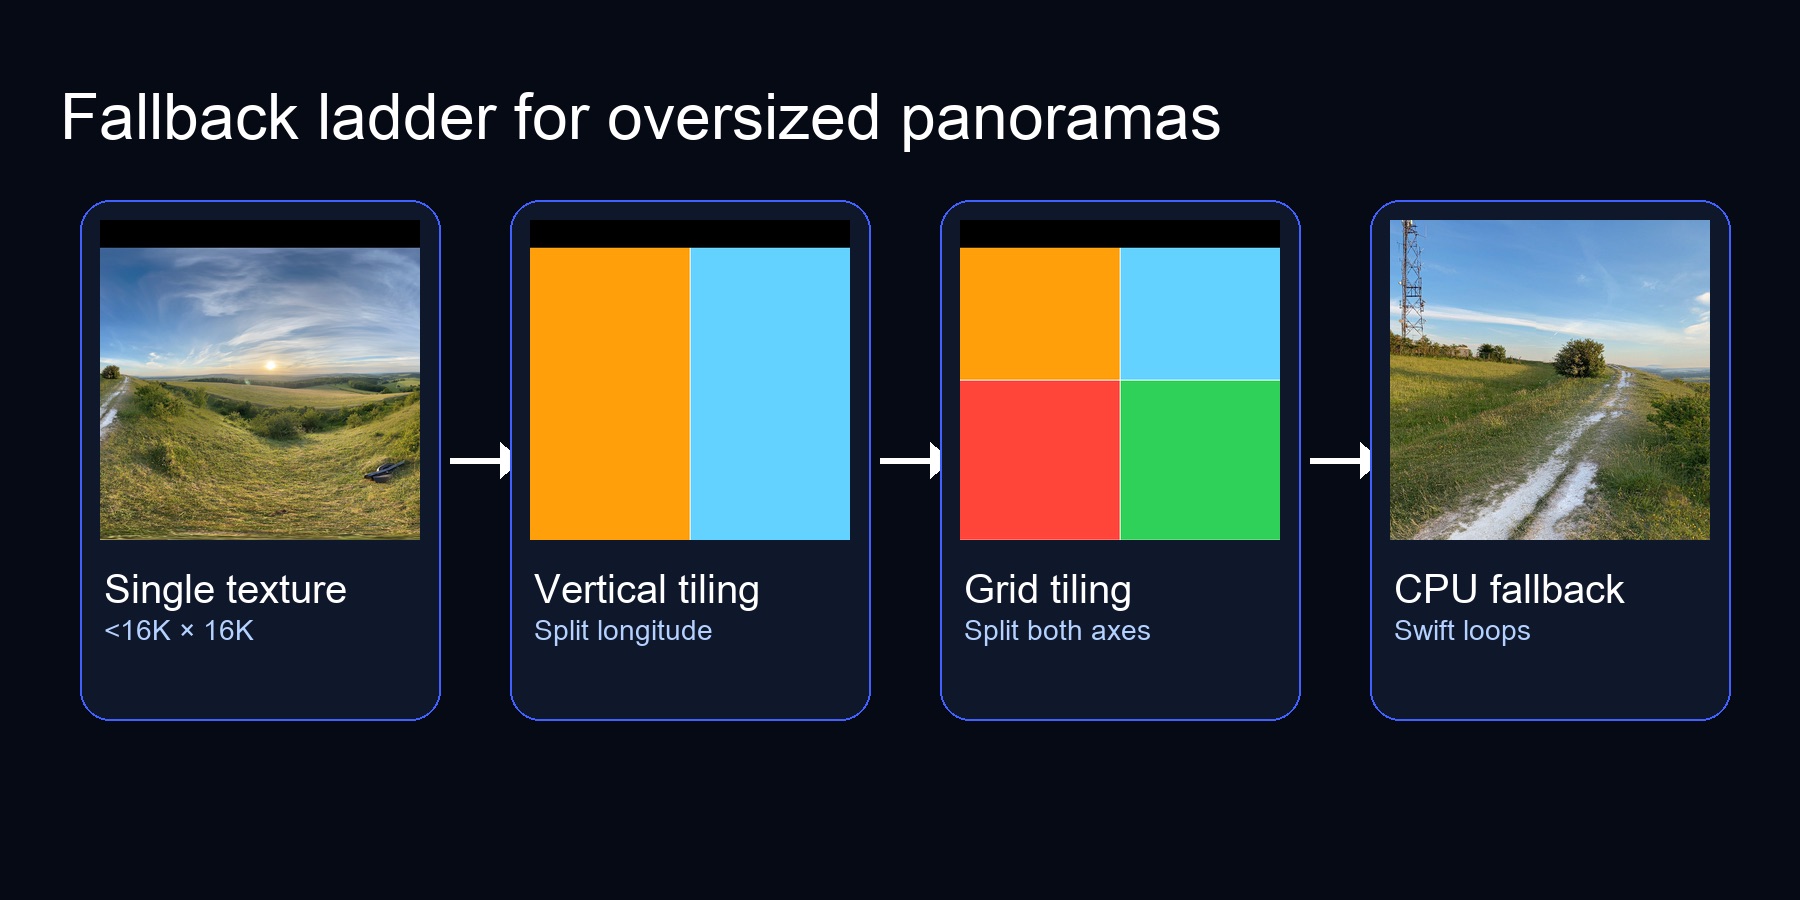
Figure 1. The decision tree our renderer follows whenever a panorama exceeds Metal's single-texture limit.
Summary — Metal caps 2D textures at 16,384 px per side on iOS (32K on recent Macs). To display 20K panoramas you need a fallback ladder: try a single texture upload, then progressively tile the image (vertical strips → grids) before punting to a CPU conversion. This post walks through each rung with simple code, diagrams, and the tradeoffs we measured.
Why the cap exists
The texture dimension limit keeps GPUs from having to allocate unbounded surfaces. Anything exceeding the device's limit must be split into smaller pieces or sampled on the CPU. Here's an example of how to query the limit based on the Metal GPU family:
let device = MTLCreateSystemDefaultDevice()!

// Query the actual texture size limit from Metal
func maxTextureSize(for device: MTLDevice) -> Int {
    // Apple10 (M5, A19+) supports 32K textures
    if device.supportsFamily(.apple10) {
        return 32768
    }

    // Apple3+ (A9 through M4) support 16K textures
    if device.supportsFamily(.apple3) {
        return 16384
    }

    // Older devices (Apple2) have 8K limit
    return 8192
}

let maxSize = maxTextureSize(for: device)
if max(cgImage.width, cgImage.height) <= maxSize {
    // ok to upload as a single texture
}
On iOS devices (A11+), the limit is 16,384 pixels per dimension. Recent Macs with M5 chips support 32K. Our test panoramas were 11K×5.5K (which fits on all devices) and 19,937×9,969 (which requires tiling on iOS).
The Metal feature set is listed by Apple here (in a PDF??).
Metal-Feature-Set-Tables.pdf > "GPU implementation limits by family" > page 7 of 15 > "Resources" > "Maximum 2D texture width and height".
| GPU Family | Max 2D Texture |
|---|---|
| Metal3 | 16,384 px |
| Metal4 | 16,384 px |
| Apple2 | 8,192 px |
| Apple3 | 16,384 px |
| Apple4 | 16,384 px |
| Apple5 | 16,384 px |
| Apple6 | 16,384 px |
| Apple7 | 16,384 px |
| Apple8 | 16,384 px |
| Apple9 | 16,384 px |
| Apple10 | 32,768 px |
| Mac2 | 16,384 px |
And these are the devices (or SoCs at least) which correspond to each GPU Family.
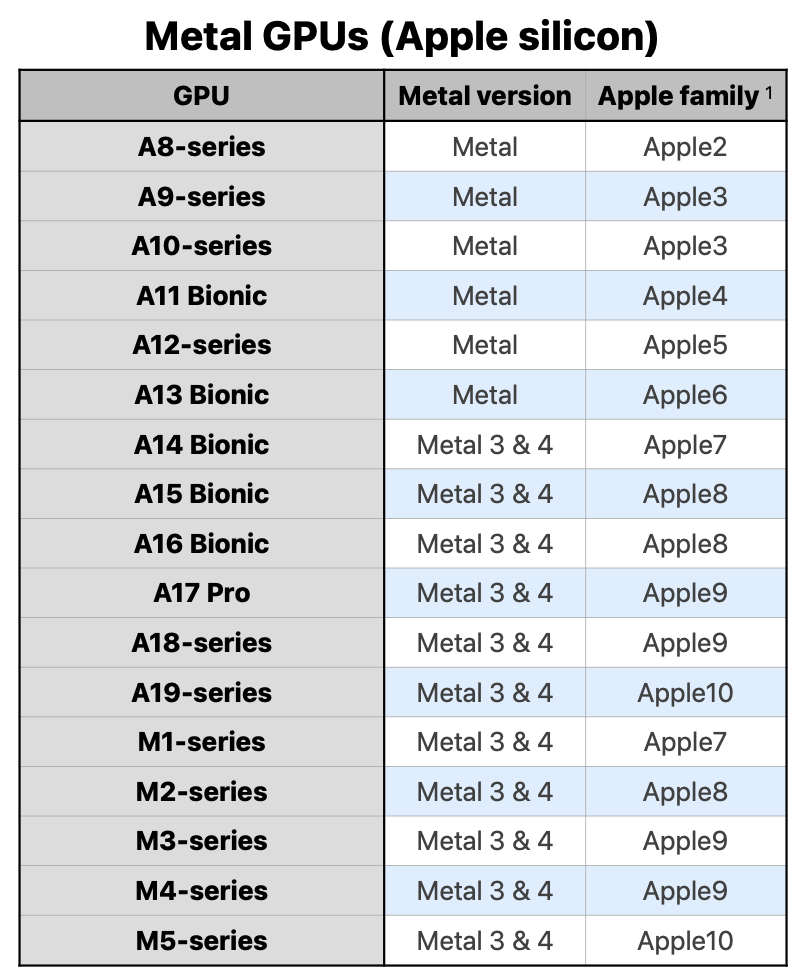
Source: Metal-Feature-Set-Tables.pdf
Strategy 1 — Single GPU texture
+──────────────+    MTLTextureDescriptor.texture2D
|  11K × 5.5K  |───▶ .texture2D, pixelFormat:.bgra8Unorm
+──────────────+    usage: .shaderRead
Upload via MTKTextureLoader:
let options: [MTKTextureLoader.Option: Any] = [
    .SRGB: false,
    .textureUsage: NSNumber(value: MTLTextureUsage.shaderRead.rawValue)
]
let texture = try loader.newTexture(cgImage: cgImage, options: options)
Fastest path. Only limitation: fails if the image exceeds the device's texture limit. That's when we escalate.
Strategy 2 — Vertical strip tiling
Original: 20K × 10K
Split into 2 strips → each 10K × 10K
┌──────────┬──────────┐
│          │          │
│  Tile 0  │  Tile 1  │  (UV origin 0.0, 0.5)
│          │          │
└──────────┴──────────┘
Key idea: cut along longitude, keep full latitude. Each tile knows its (uvOrigin, uvSize) within the source panorama.
let tilesX = Int(ceil(Double(width) / Double(maxTextureSize)))

for tileX in 0..<tilesX {
    let start = tileX * maxTextureSize
    let tileWidth = min(maxTextureSize, width - start)
    let rect = CGRect(
        x: start,
        y: 0,
        width: tileWidth,
        height: height  // Full height for vertical strips
    )
    let cropped = cgImage.cropping(to: rect)!
    let texture = try loader.newTexture(cgImage: cropped, options: options)

    tiles.append(PanoramaTileTexture(
        texture: texture,
        uvOrigin: [Float(start)/Float(width), 0],
        uvSize: [Float(tileWidth)/Float(width), 1]
    ))
}
During the compute pass we bind both textures and choose based on uv.x:
float wrappedU = uv.x - floor(uv.x);
if (wrappedU < tile1Start) { sample tile0 } else { sample tile1 }
This cut the 20K panorama from 78s CPU to 0.93s GPU on our benchmarks. Pros: low tile count, simple metadata. Cons: still limited if the image height also exceeds the texture limit.
Slicing the image on the CPU
The tiling happens in Swift before we touch Metal. We use CGImage.cropping(to:) to extract each strip, then upload each strip as a separate texture:
// Figure out how many tiles we need
let tileCount = Int(ceil(Double(imageWidth) / Double(maxTextureSize)))

for i in 0..<tileCount {
    // Calculate this tile's horizontal slice
    let startX = i * tileWidth
    let actualWidth = min(tileWidth, imageWidth - startX)

    // Crop the strip from the source image
    let cropRect = CGRect(x: startX, y: 0, width: actualWidth, height: imageHeight)
    let tileImage = cgImage.cropping(to: cropRect)!

    // Upload to Metal (each tile is now under the size limit)
    let texture = textureLoader.newTexture(cgImage: tileImage, options: options)
    tiles.append(texture)
}
The key is that each tile stores its UV origin so the shader knows where it belongs in the full panorama. Tile 0 starts at U=0, tile 1 starts at U=0.5 (for 2 tiles), etc.
Strategy 3 — Grid tiling
20K × 20K (hypothetical)
Split into 4 tiles (2×2 grid)
┌───────┬───────┐
│  0,0  │  1,0  │
├───────┼───────┤
│  0,1  │  1,1  │
└───────┴───────┘
We extend the loader to tile along both axes:
let tilesX = Int(ceil(Double(width) / Double(maxTextureSize)))
let tilesY = Int(ceil(Double(height) / Double(maxTextureSize)))
The shader becomes a small loop over metadata:
// Tile metadata structure
struct PanoramaTile {
    float2 uvOrigin;   // Where this tile starts in UV space (e.g., [0.5, 0])
    float2 uvSize;     // Size of this tile in UV space (e.g., [0.5, 1.0])
    uint textureIndex; // Which texture slot this tile occupies
};

// In the compute kernel:
float2 wrappedUV = float2(uv.x - floor(uv.x), clamp(uv.y, 0.0, 1.0));

for (uint i = 0; i < uniforms.tileCount; ++i) {
    PanoramaTile tile = tiles[i];

    // Check if this UV falls within this tile's region
    bool inTileX = wrappedUV.x >= tile.uvOrigin.x &&
                   wrappedUV.x < (tile.uvOrigin.x + tile.uvSize.x);

    bool inTileY = wrappedUV.y >= tile.uvOrigin.y &&
                   wrappedUV.y < (tile.uvOrigin.y + tile.uvSize.y);

    if (inTileX && inTileY) {
        // Remap global UV to local tile UV
        float2 localUV = (wrappedUV - tile.uvOrigin) / tile.uvSize;
        return tileTextures[tile.textureIndex].sample(sampler, localUV);
    }
}
ASCII of the texture bindings (we cap at 16):
Metal slot layout
[0] tile0  [1] tile1  [2] tile2  [3] tile3  ...  [15] tile15
[16] output cube texture
Grid tiling was ~10% faster than vertical strips in our tests (0.84s vs 0.93s for the 20K panorama) because each tile is smaller, which helps texture cache locality near the poles.
The tiled compute shader
The key challenge in the shader is figuring out which tile to sample for any given UV coordinate, then remapping that global UV to the tile's local UV space.
Here's the core logic, which runs identically to the single-texture version except for the tile selection:
kernel void equirectangularToCubeTiled(
    texture2d<float> tile0 [[texture(0)]],
    texture2d<float> tile1 [[texture(1)]],
    // ... up to 4 tiles
    texturecube<float, access::write> cubeOutput [[texture(4)]],
    constant Uniforms &uniforms [[buffer(0)]],
    uint3 gid [[thread_position_in_grid]])
{
    // Same as before: get direction, convert to panorama UV
    float3 direction = cubeFaceDirection(gid.z, pixelUV);
    float2 globalUV = directionToUV(direction);

    // NEW: Figure out which tile this UV falls into
    float wrappedU = globalUV.x - floor(globalUV.x);  // Wrap at seam
    uint tileIndex = uint(wrappedU * float(uniforms.tileCount));
    tileIndex = min(tileIndex, uniforms.tileCount - 1);  // Clamp to valid range

    // NEW: Remap global U → local tile U
    // If we have 2 tiles: tile 0 covers U=[0, 0.5), tile 1 covers U=[0.5, 1)
    // A global U of 0.75 becomes local U of 0.5 in tile 1
    float tileWidth = 1.0 / float(uniforms.tileCount);
    float tileStartU = float(tileIndex) * tileWidth;
    float localU = (wrappedU - tileStartU) / tileWidth;
    float2 localUV = float2(localU, globalUV.y);

    // Sample from the correct tile (switch is required in Metal)
    float4 color;
    switch (tileIndex) {
        case 0: color = tile0.sample(sampler, localUV); break;
        case 1: color = tile1.sample(sampler, localUV); break;
        // ...
    }

    cubeOutput.write(color, uint2(gid.xy), gid.z);
}
The UV remapping math is the heart of tiling. Think of it like this: if you have 2 tiles, tile 0 "owns" the left half (U=0 to 0.5) and tile 1 owns the right half (U=0.5 to 1.0). When the shader wants to sample at global U=0.75, it needs to:
- Determine that 0.75 falls in tile 1 (the right half)
- Remap 0.75 to local coordinates:
(0.75 - 0.5) / 0.5 = 0.5 - Sample tile 1 at local U=0.5
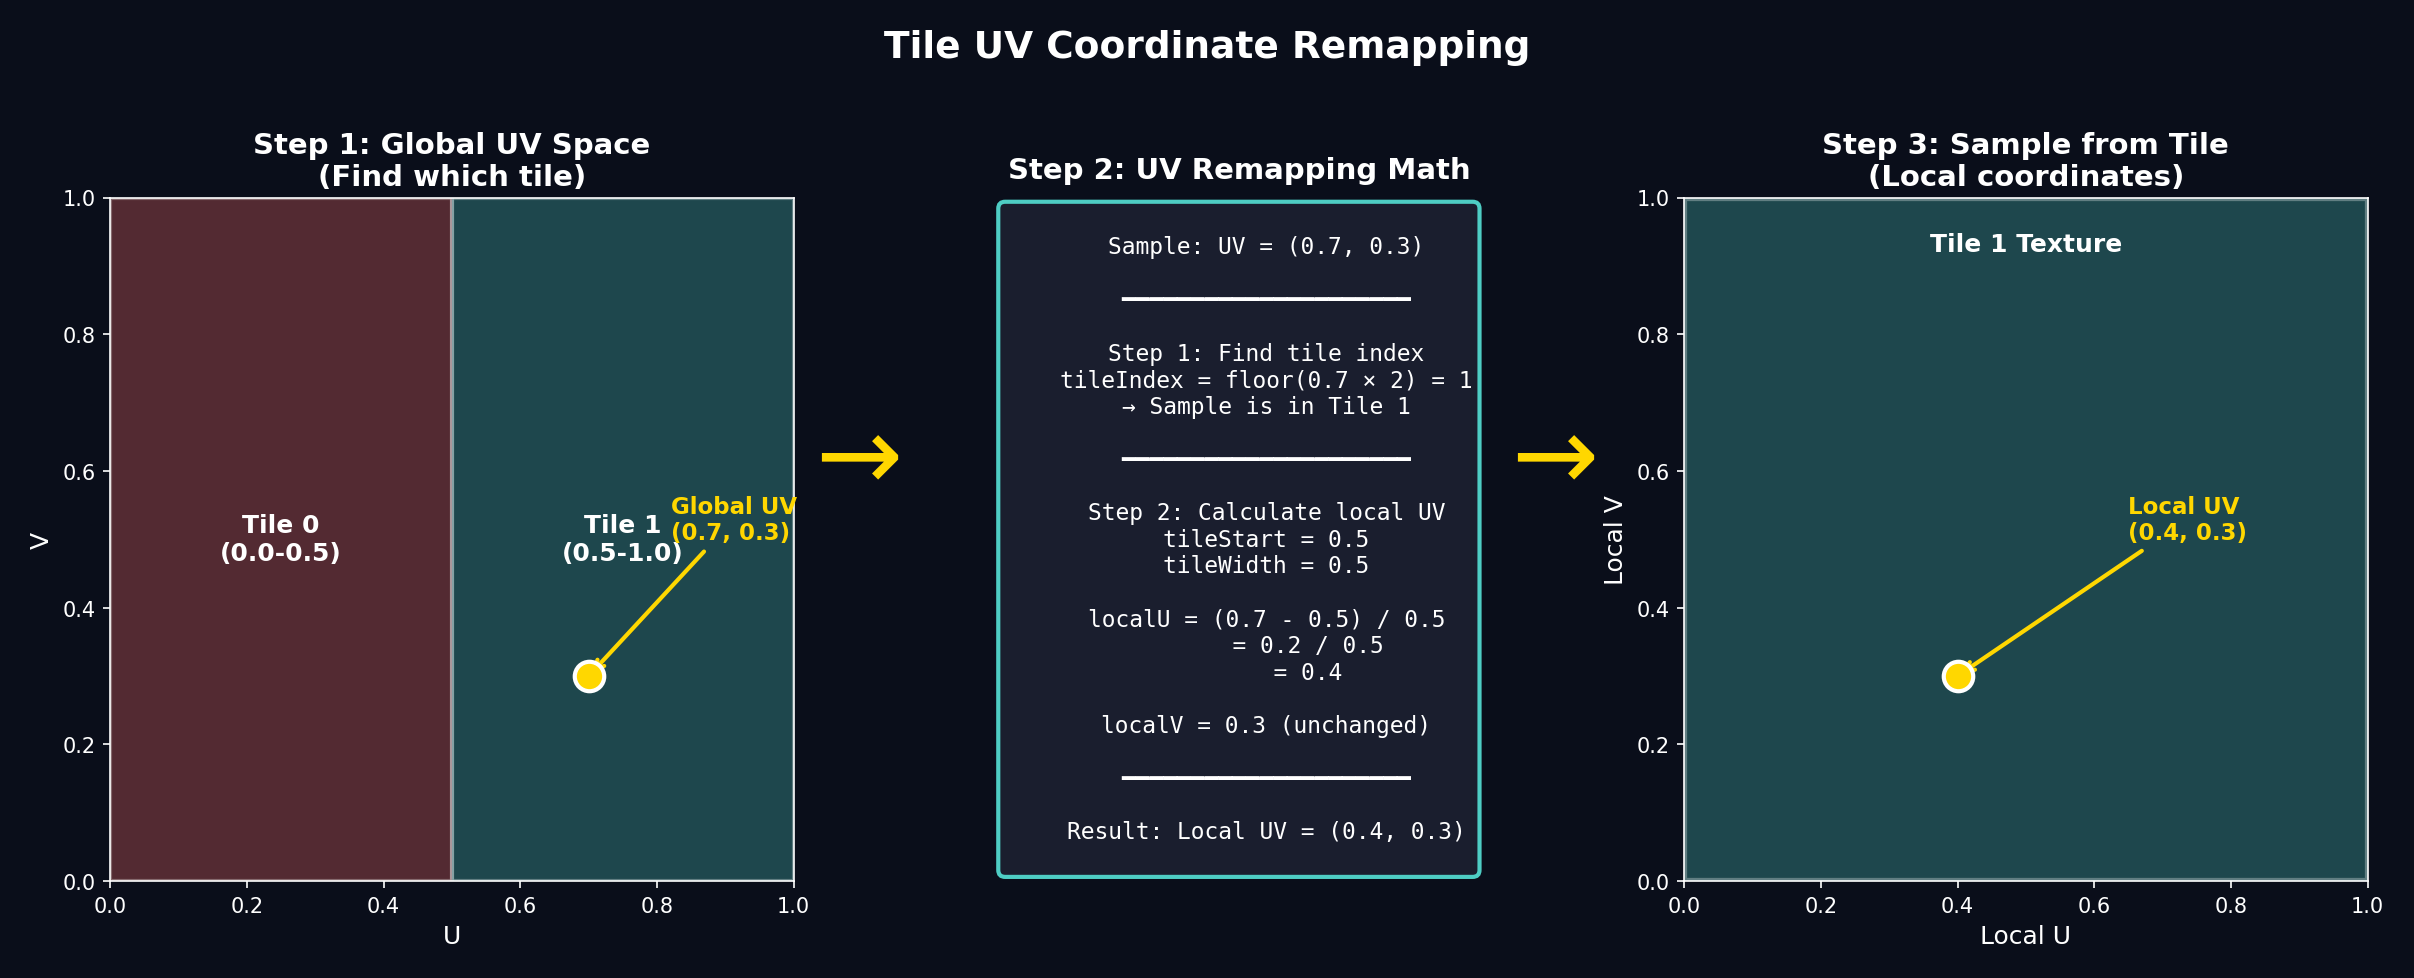
Figure 2. The UV remapping process: find which tile contains the sample point, then convert global UV to local tile UV.
Strategy 4 — CPU fallback
Sometimes the GPU path still fails: more than 16 tiles needed, out-of-memory errors, or you need bit-exact deterministic output for offline export. The CPU fallback mirrors the GPU shader logic exactly—it's just ~100× slower because we're doing millions of texture samples on the CPU instead of GPU cores.
Why you need bilinear filtering
The GPU's texture sampler does bilinear filtering automatically. On CPU, we have to implement it ourselves. Without filtering, you'd see blocky pixels when the panorama resolution doesn't match the cube face resolution exactly.
Bilinear filtering samples four neighboring pixels and blends them based on where the sample point falls:
func sample(u: Float, v: Float) -> SIMD4<Float> {
    // Convert UV to pixel coordinates (may land between pixels)
    let fx = u * Float(width - 1)
    let fy = v * Float(height - 1)

    // Get the four corner pixel coordinates
    let x0 = Int(floor(fx))
    let x1 = min(x0 + 1, width - 1)
    let y0 = Int(floor(fy))
    let y1 = min(y0 + 1, height - 1)

    // How far between pixels? (0.0 = exactly on x0, 1.0 = exactly on x1)
    let tx = fx - Float(x0)
    let ty = fy - Float(y0)

    // Read the four corners and blend
    let c00 = readPixel(x0, y0)
    let c10 = readPixel(x1, y0)
    let c01 = readPixel(x0, y1)
    let c11 = readPixel(x1, y1)

    // Interpolate horizontally, then vertically
    let top = mix(c00, c10, tx)
    let bottom = mix(c01, c11, tx)
    return mix(top, bottom, ty)
}
The conversion loop
The CPU conversion uses the same math as the shader. The key to acceptable performance is parallelizing aggressively:
// Process all 6 faces in parallel
DispatchQueue.concurrentPerform(iterations: 6) { face in
    // Within each face, process rows in parallel
    DispatchQueue.concurrentPerform(iterations: faceSize) { y in
        for x in 0..<faceSize {
            // Convert pixel → cube face UV → direction → panorama UV
            let cubeUV = SIMD2<Float>(
                (Float(x) + 0.5) / Float(faceSize) * 2.0 - 1.0,
                (Float(y) + 0.5) / Float(faceSize) * 2.0 - 1.0
            )
            let direction = cubeFaceDirection(face, cubeUV)
            let panoUV = directionToUV(direction)

            // Sample and write (same as GPU, just 100× slower per pixel)
            let color = imageSampler.sample(u: panoUV.x, v: panoUV.y)
            writePixel(face, x, y, color)
        }
    }
}
The nested DispatchQueue.concurrentPerform gives us parallelism at two levels: faces and rows within each face. On an 8-core Mac, this brings a 20K panorama conversion from ~5 minutes (single-threaded) to ~78 seconds—still 85× slower than the GPU path, but workable as a fallback.
Pros: works for any size, produces identical results to the GPU path, no Metal texture limits to worry about.
Cons: 38–78s runtime on modern Macs for 11–20K inputs, ~1.5 GB RAM for the decoded image plus output buffers.
Putting it together — automatic ladder
switch strategy {
   case .automatic:
      if trySingleTexture(cgImage) { break }
      if tryTiling(.verticalStrips) { break }
      if tryTiling(.grid) { break }

      runCPUFallback(cgImage)

   case .forceVerticalTiles:
      _ = tryTiling(.verticalStrips) || runCPUFallback(cgImage)
      // ... etc
}
ASCII flow:
[Upload single texture?]
     | yes
   render
     | no
[Vertical tiles succeed?]
     | yes → render
     | no
[Grid tiles succeed?]
     | yes → render
     | no
[CPU fallback]
Benchmarks
All tests performed on Apple Silicon with Release builds. The results are total time from CGImage input to usable MTLTexture cube map output:
| Panorama | CPU Fallback | GPU Vertical Tiles | GPU Grid Tiles | Speedup |
|---|---|---|---|---|
| 11K × 5.5K | 38.2s | 0.34s | 0.31s | ~110× |
| 19.9K × 10K | 78.2s | 0.93s | 0.84s | ~85× |

Figure 3. Performance comparison showing the dramatic speedup from GPU tiling—up to 110× faster than CPU fallback.
The dramatic speedup comes from three factors:
- Massive parallelism — GPU shader cores process millions of pixels simultaneously
- Hardware texture sampling — Built-in bilinear filtering and optimized memory access patterns
- No CPU↔memory bottleneck — Data stays on GPU after upload
Additional observations:
- Vertical tiles keep resource usage low (only 2 textures for 20K×10K) and are perfect for most 2:1 panoramas
- Grid tiles cost more texture slots (up to 16) but squeeze out ~10% extra performance and handle non-standard aspect ratios
- CPU fallback remains as the safety net for extremely large assets or offline export scenarios requiring bit-exact determinism
Memory comparison
The GPU tiled path also uses less peak memory than the CPU fallback:
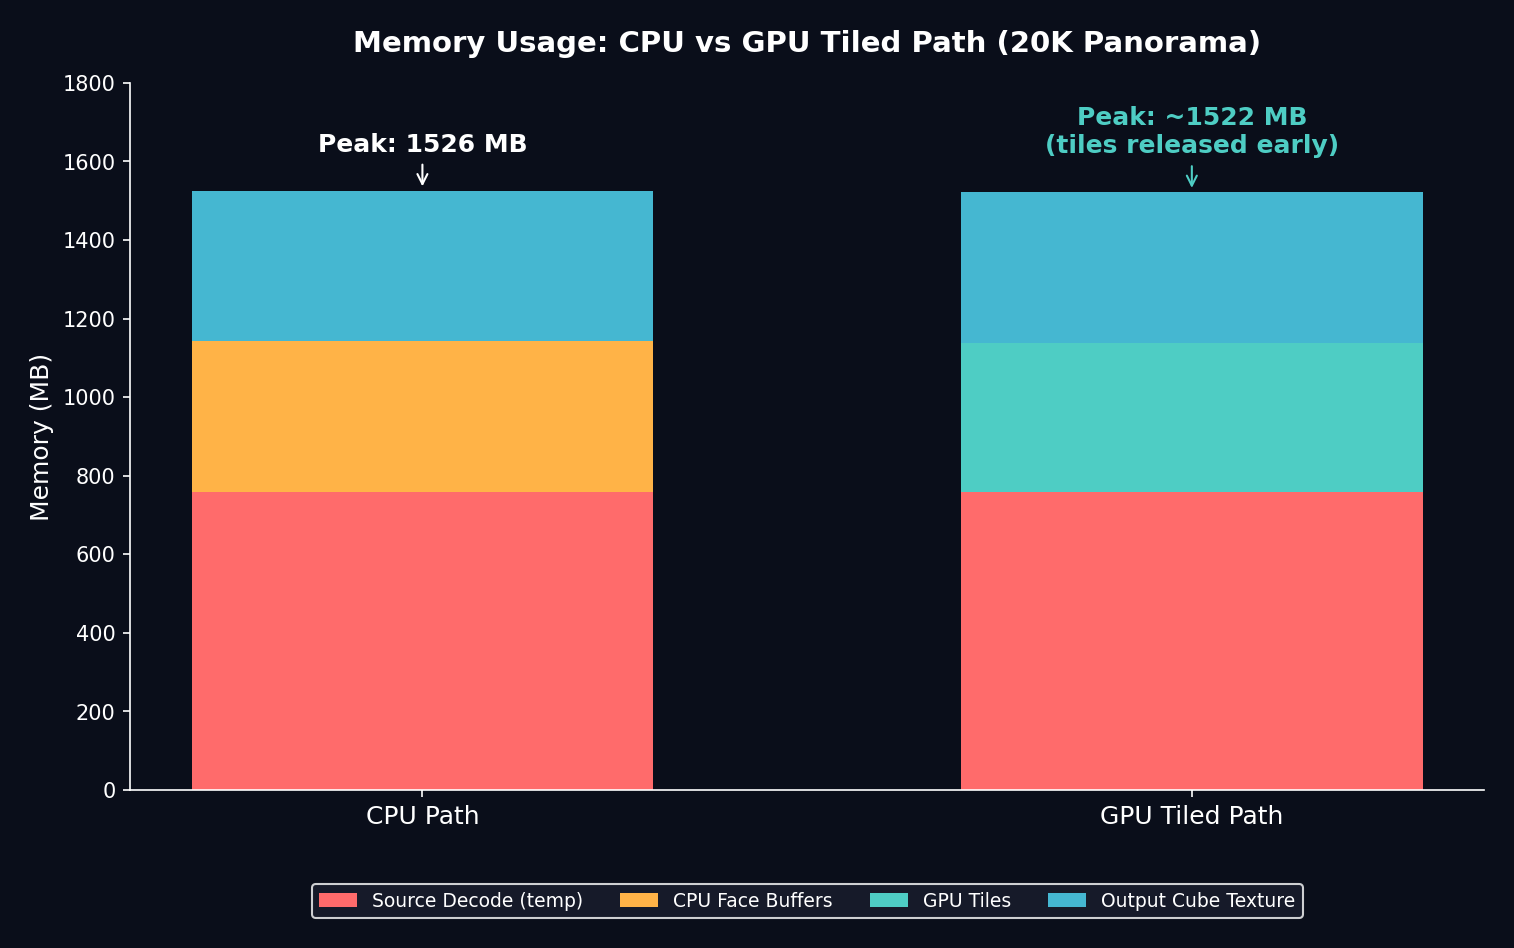
Figure 4. Memory breakdown for a 20K panorama. The GPU path can release tiles after upload, reducing peak usage.
Visual aids
Panorama view            Cube face view
┌───────────────────┐    ┌────────┐
│ longitudinal lines│    │  sky   │
│ ■ camera forward  │    │  ▲     │
└───────────────────┘    └────────┘
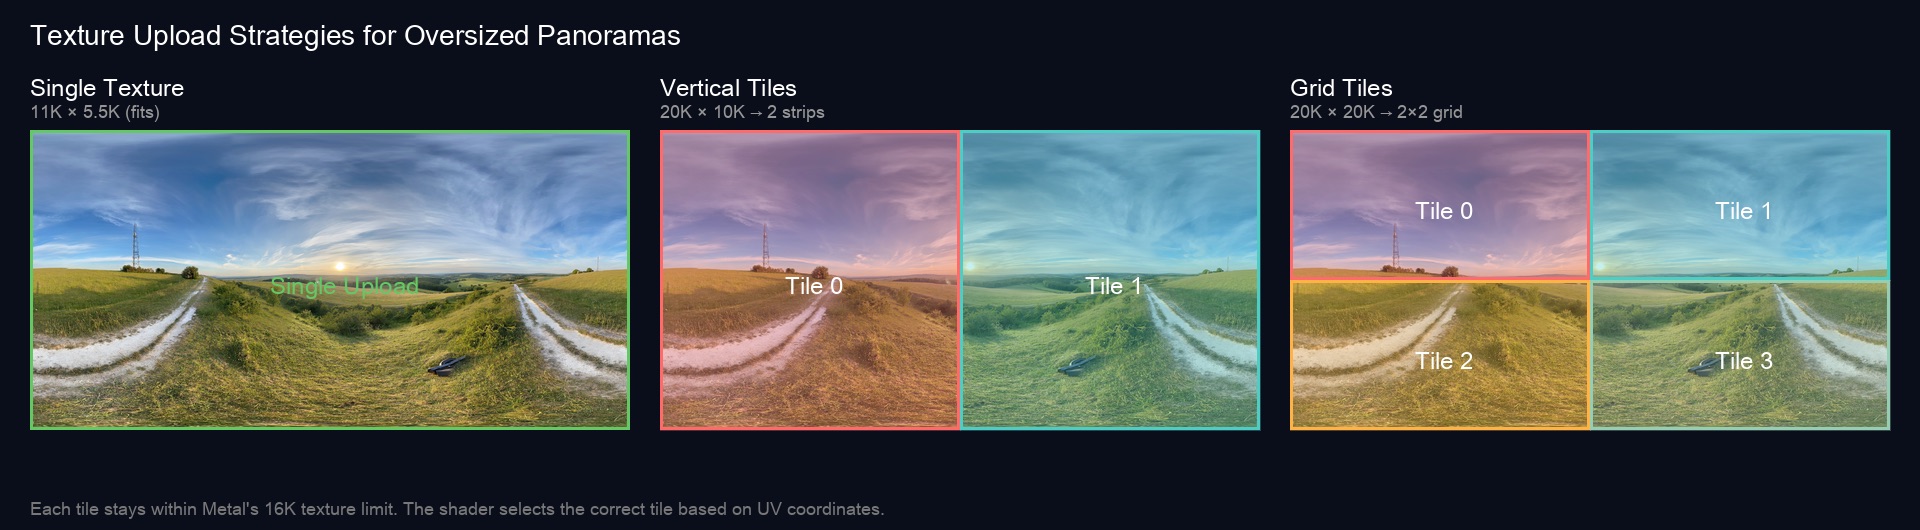
Figure 5. Visualising how the same panorama is sliced for each upload strategy before being converted into cube faces.
Left: single texture (fits). Middle: vertical strips (2 tiles). Right: grid tiles (4 tiles). The rendered cube map looks the same—the difference is all under the hood.
Takeaways
- Keep work on the GPU. Hardware texture units and compute pipelines devour these conversions in milliseconds once the data is in VRAM.
- Tile gradually. Longitudinal splits cover most panoramas; only fall back to grids when height also exceeds the cap.
- Leave a CPU escape hatch. There will always be some "mega" image, offline export requirement, or simulator configuration that needs it.
Next time I'll cover how we stream these tiles incrementally so users see a preview almost instantly, even before the full-resolution cube finishes baking.