Animating Gradient-Filled Text in UIKit
How to render an animated gradient inside selected attributed-string ranges using TextKit, NSLayoutManager, and Core Graphics.
UIKit's standard text views can style text with NSAttributedString, but they cannot fill a range of glyphs with a gradient. The built-in .foregroundColor attribute accepts a single color, not a CAGradientLayer or CGGradient.
This post builds a small TextKit-based renderer that adds an animated gradient fill to selected attributed-string ranges. A highlighted phrase can sit inside an ordinary paragraph while the surrounding text keeps its usual appearance.
The important idea is simple:
1. Lay out the text normally.
2. Add a custom attribute to the ranges that should be gradient-filled.
3. Save the current graphics state.
4. Draw the glyphs into the Core Graphics clipping region.
5. Paint a gradient through the glyph-shaped clip.
6. Restore the saved state and continue drawing ordinary text.
7. Move the gradient a little on every display frame.
The result is still real text. It wraps, measures, scales with Dynamic Type, and remains accessible as text instead of becoming a rendered image.
The stencil model
Imagine painting through a sheet with letter-shaped holes. The gradient is a broad stroke of paint; the glyph outlines decide where it can reach the canvas. Core Graphics expresses that restriction as a clipping region. The empty spaces inside letters remain protected too.
Start with laid-out text
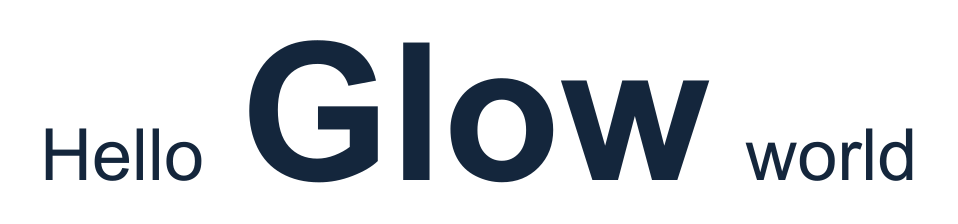
TextKit determines the glyph shapes, sizes, baselines and line breaks. In this example, “Glow” is larger and bold, with ordinary text on either side.
Cut the letter-shaped openings
The blue sheet represents the blocked region; the checkerboard shows the transparent openings. The counter inside “o” remains blocked, just as it would in a physical stencil.

Paint through the stencil
The gradient can cover a rectangular area. The clipping region lets it reach only the letter-shaped openings.

The renderer temporarily intersects the context's existing clip with the glyph shapes, paints through that intersection, and restores the saved graphics state. Restoring keeps the painted pixels; it restores the clipping region and text drawing mode used for the next run. The stencil is a drawing rule, not a separate bitmap mask.
The text layout stays in TextKit. Only the fill changes. The reusable KHGradientTextView article applies this model to a component with four animation directions and automatic display-link management.
The final effect
The custom view will be used like a normal UITextView:
let gradientColors: [UIColor] = [
    UIColor(red: 1.0, green: 0.30, blue: 0.72, alpha: 1.0),
    UIColor(red: 0.38, green: 0.40, blue: 0.95, alpha: 1.0)
]

let text = NSMutableAttributedString()

text.append(NSAttributedString(
    string: "Watch ",
    attributes: [
        .font: UIFont.preferredFont(forTextStyle: .body),
        .foregroundColor: UIColor.label
    ]
))

text.append(NSAttributedString(
    string: "vivid flowing colors",
    attributes: [
        .font: UIFont.preferredFont(forTextStyle: .body),
        .foregroundColor: UIColor.label,
        .gradient: gradientColors
    ]
))

let textView = GradientTextView()
textView.adjustsFontForContentSizeCategory = true
textView.isEditable = false
textView.attributedText = text
textView.animateGradients = true
The .gradient key is not understood by UIKit by itself. It becomes meaningful only because GradientTextView installs a custom layout manager later in this tutorial.
Step 1: Define a custom attributed-string key
An attributed string is a string plus a dictionary of attributes attached to character ranges. UIKit ignores attributes it does not know about, which gives us a convenient way to pass rendering metadata through the normal text-layout pipeline.
import UIKit

extension NSAttributedString.Key {
    static let gradient = NSAttributedString.Key("Gradient")
}
The value stored under this key will be an array of UIColor values. The array supports two-color gradients as well as multiple color stops.
Keep the key name specific to your application or module. A custom key is just a string, so a generic name could collide with another piece of attributed-string code.
Step 2: Build attributed ranges
The normal text attributes still need to be supplied. In particular, keep a .foregroundColor value even for gradient ranges. It provides a fallback if the string is displayed by a standard UILabel, copied into another text view, or rendered by a code path that does not understand the custom key.
let baseAttributes: [NSAttributedString.Key: Any] = [
    .font: UIFont.preferredFont(forTextStyle: .body),
    .foregroundColor: UIColor.secondaryLabel
]

var gradientAttributes = baseAttributes
gradientAttributes[.gradient] = gradientColors

let attributedString = NSMutableAttributedString()
attributedString.append(NSAttributedString(
    string: "Add a little motion with ",
    attributes: baseAttributes
))
attributedString.append(NSAttributedString(
    string: "vivid flowing colors",
    attributes: gradientAttributes
))
attributedString.append(NSAttributedString(
    string: " inside an ordinary paragraph.",
    attributes: baseAttributes
))
Each appended string creates an attributed run. The custom layout manager can later discover exactly which character ranges contain .gradient.
In a larger project, this is a good place for a small semantic model such as:
struct StyledText {
    let text: String
    let color: UIColor?
    let gradient: [UIColor]?
    let bold: Bool
}
The model describes the content, while the attributed string remains the hand-off format to UIKit's text engine.
Step 3: Install a custom TextKit layout manager
TextKit 1 is built from an NSTextStorage, an NSLayoutManager, and one or more NSTextContainer objects. UITextView normally creates and connects these objects for you. Here we create them ourselves so that the layout manager can participate in drawing.
final class GradientTextView: UITextView {

    override init(frame: CGRect, textContainer: NSTextContainer?) {
        let textStorage = NSTextStorage()
        let layoutManager = GradientLayoutManager()

        textStorage.addLayoutManager(layoutManager)

        let container: NSTextContainer

        if let textContainer = textContainer {
            container = textContainer
        }
        else {
            container = NSTextContainer()
            container.widthTracksTextView = true
            container.lineFragmentPadding = 0
            container.maximumNumberOfLines = 0
            container.lineBreakMode = .byWordWrapping
            layoutManager.addTextContainer(container)
        }

        super.init(frame: frame, textContainer: container)

        self.textContainerInset = .zero
    }

    required init?(coder: NSCoder) {
        fatalError("init(coder:) has not been implemented")
    }
}
The text view still owns the normal text storage and text container behavior. The only special part is the GradientLayoutManager that will intercept gradient runs.
Step 4: Find the rectangles occupied by gradient text
TextKit separates characters from glyphs. A character range is what we get from NSAttributedString; a glyph range is what the layout manager draws.
Before the superclass draws the glyphs, find each gradient character range, convert it to a glyph range, and ask TextKit for the enclosing rectangles:
final class GradientLayoutManager: NSLayoutManager {

    fileprivate var animationProgress: CGFloat = 0

    private(set) var gradientRects: [CGRect] = []

    override func drawGlyphs(forGlyphRange glyphsToShow: NSRange, at origin: CGPoint) {
        guard let textStorage = self.textStorage else {
            super.drawGlyphs(forGlyphRange: glyphsToShow, at: origin)
            return
        }

        self.gradientRects.removeAll(keepingCapacity: true)

        let characterRange = self.characterRange(
            forGlyphRange: glyphsToShow,
            actualGlyphRange: nil
        )

        textStorage.enumerateAttribute(
            .gradient,
            in: characterRange,
            options: [.longestEffectiveRangeNotRequired],
            using: { value, subrange, _ in
                guard let colors = value as? [UIColor], !colors.isEmpty else {
                    return
                }

                let glyphRange = self.glyphRange(
                    forCharacterRange: subrange,
                    actualCharacterRange: nil
                )

                guard let textContainer = self.textContainer(
                    forGlyphAt: glyphRange.location,
                    effectiveRange: nil
                ) else {
                    return
                }

                let notSelected = NSRange(location: NSNotFound, length: 0)

                self.enumerateEnclosingRects(
                    forGlyphRange: glyphRange,
                    withinSelectedGlyphRange: notSelected,
                    in: textContainer,
                    using: { rect, _ in
                        var rect = rect
                        rect.origin.x += origin.x
                        rect.origin.y += origin.y
                        self.gradientRects.append(rect)
                    }
                )
            }
        )

        super.drawGlyphs(forGlyphRange: glyphsToShow, at: origin)
    }
}
enumerateEnclosingRects is important for wrapping. A highlighted phrase may occupy multiple line fragments, so there can be more than one rectangle for a single attributed range.
The gradient is therefore local to each line fragment. This is usually what we want for a highlighted phrase in body text; every line gets a complete left-to-right color treatment.
Step 5: Clip the gradient to the glyphs
The key drawing hook is showCGGlyphs. UIKit calls it for each glyph run. For an ordinary run, call the superclass. For a gradient run, change the Core Graphics text drawing mode to .clip:
override func showCGGlyphs(
    _ glyphs: UnsafePointer<CGGlyph>,
    positions: UnsafePointer<CGPoint>,
    count glyphCount: Int,
    font: UIFont,
    textMatrix: CGAffineTransform,
    attributes: [NSAttributedString.Key: Any] = [:],
    in context: CGContext
) {
    guard let colors = attributes[.gradient] as? [UIColor], !colors.isEmpty else {
        super.showCGGlyphs(
            glyphs,
            positions: positions,
            count: glyphCount,
            font: font,
            textMatrix: textMatrix,
            attributes: attributes,
            in: context
        )
        return
    }

    guard let gradient = Self.makeGradient(colors: colors) else {
        return
    }

    context.saveGState()
    context.setTextDrawingMode(.clip)

    // Add the current glyph run to the clipping path.
    super.showCGGlyphs(
        glyphs,
        positions: positions,
        count: glyphCount,
        font: font,
        textMatrix: textMatrix,
        attributes: attributes,
        in: context
    )

    for rect in self.gradientRects {
        context.saveGState()
        UIBezierPath(rect: rect).addClip()

        let width = rect.width
        let offset = -width * self.animationProgress

        let start = CGPoint(
            x: rect.minX + offset,
            y: rect.minY
        )
        let end = CGPoint(
            x: rect.minX + width * 2 + offset,
            y: rect.minY
        )

        context.drawLinearGradient(
            gradient,
            start: start,
            end: end,
            options: [.drawsBeforeStartLocation, .drawsAfterEndLocation]
        )

        context.restoreGState()
    }

    context.restoreGState()
}
The sequence is:
setTextDrawingMode(.clip)
    ↓
draw glyphs, creating a glyph-shaped clip
    ↓
clip to the line rectangle
    ↓
draw the gradient
The gradient never gets drawn outside the letters because the glyphs are the active clipping path.
The outer saveGState / restoreGState pair confines this behavior to the current glyph run. The inner pair confines each rectangle to its own iteration: restoring it returns to the glyph-shaped clip before considering the next line fragment.
The blue outline below represents the original clipping region after restoration. The gradient is still on the canvas, and the next ordinary word can draw normally.
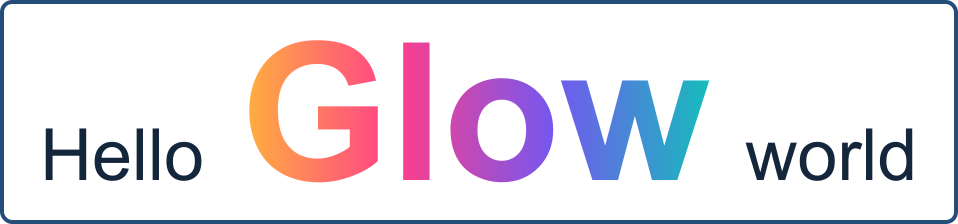
A saved graphics state includes the clipping region and text drawing mode. It does not save an image of the canvas. Without the outer restore, later drawing would remain confined to these letters. A larger rectangle cannot enlarge the current clip; restoring the saved state brings the caller's region back. See Apple's documentation for saved graphics state and clipping.
Step 6: Create a looping gradient
The renderer needs a CGGradient, not an array of UIColor values. This helper converts the colors and creates evenly-spaced locations:
private extension GradientLayoutManager {

    static func makeGradient(colors input: [UIColor]) -> CGGradient? {
        let colorSpace = CGColorSpaceCreateDeviceRGB()

        guard let firstColor = input.first else { return nil }

        // Two complete periods, including the closing stop.
        var colors = input
        colors.append(contentsOf: input)
        colors.append(firstColor)

        let segment = 1.0 / CGFloat(max(colors.count - 1, 1))
        let locations = colors.indices.map({ index in
            CGFloat(index) * segment
        })

        return CGGradient(
            colorsSpace: colorSpace,
            colors: colors.map(\.cgColor) as CFArray,
            locations: locations
        )
    }
}
With two input colors, the actual gradient becomes:
first color → second color → first color → second color → first color
The full gradient spans two line widths and contains two complete palette periods. Shifting it by one line width moves by exactly one period. Its appearance therefore matches at the animation boundary for any palette length. The letter shapes remain fixed; only the gradient endpoints move.
If you do not want animation, use a gradient that starts at rect.minX and ends at rect.maxX, and do not duplicate the colors.
Step 7: Animate with CADisplayLink
The gradient is still drawn by Core Graphics, so changing a property on the CGGradient will not animate it. Instead, store a progress value on the layout manager and invalidate the view for each display frame.
The view owns a display link and starts it when animateGradients becomes true:
var animateGradients: Bool = false {
    didSet {
        if self.animateGradients {
            self.animationStartTime = CACurrentMediaTime()
            self.beginDisplayLink()
        }
        else {
            self.displayLink?.isPaused = true
        }
    }
}

private var displayLink: CADisplayLink?
private var animationStartTime: CFTimeInterval = 0
private var animationDuration: CFTimeInterval = 2

private func beginDisplayLink() {
    guard self.displayLink == nil else {
        self.displayLink?.isPaused = false
        return
    }

    let displayLink = CADisplayLink(
        target: self,
        selector: #selector(self.displayLinkTick(_:))
    )
    displayLink.add(to: RunLoop.main, forMode: .common)
    self.displayLink = displayLink
}

@objc private func displayLinkTick(_ displayLink: CADisplayLink) {
    let elapsed = CACurrentMediaTime() - self.animationStartTime
    let cycleTime = elapsed.truncatingRemainder(
        dividingBy: self.animationDuration
    )
    let progress = CGFloat(cycleTime / self.animationDuration)

    if let layoutManager = self.layoutManager as? GradientLayoutManager {
        layoutManager.animationProgress = progress
        self.setNeedsDisplay()
    }
}
Use the common run-loop modes so the animation continues during scrolling. Stop or invalidate the display link when the view leaves its window:
override func willMove(toWindow newWindow: UIWindow?) {
    super.willMove(toWindow: newWindow)

    guard newWindow == nil else { return }

    self.displayLink?.invalidate()
    self.displayLink = nil
}
For a small tutorial view, redrawing the complete text view each frame is usually acceptable. If this effect appears in a scrolling list or on a large text document, profile it before choosing a higher refresh rate or adding many animated instances.
Optional: draw a gradient underline
The same technique also works for a custom underline. Add a custom underline style to the range, intercept it in drawUnderline(forGlyphRange:...), build a curved UIBezierPath, turn the stroked path into a clip, and draw the gradient through it.
Conceptually:
context.saveGState()
defer { context.restoreGState() }
context.addPath(curvedUnderline.cgPath)
context.setLineWidth(3)
context.replacePathWithStrokedPath()
context.clip()
context.drawLinearGradient(gradient, start: start, end: end, options: [])
The underline can use the same .gradient attribute, so its colors remain synchronized with the text. Save the graphics state before this clipping pass and restore it afterward, just as for glyph drawing. KHGradientTextView itself preserves native underline rendering; this custom gradient underline is an optional extension.
Common mistakes
Expecting UILabel to understand the custom attribute
UILabel will ignore .gradient. It will use the fallback .foregroundColor. The attributed string only carries the metadata; the custom layout manager supplies the rendering behavior.
Drawing the gradient without clipping
If you draw a gradient directly into the view, it will cover the whole rectangle rather than the glyphs. Always add the glyphs to the Core Graphics clip first.
Forgetting that one run can wrap
Never assume a highlighted range has one rectangle. Use TextKit's enclosing-rectangle enumeration so every line fragment receives the effect.
Using only one copy of the color palette
An animated gradient with one pass from color A to color B will jump when it reaches the end. Repeating the palette gives the moving gradient enough content to loop smoothly.